Make your home smarter with Node Red
The Smart Home isn’t smart out of the box. Appliance manufacturers ship their products with apps that offer limited automation. Your smart lights have an app that sets simple schedules. Your Smart TV turns on from your phone. However, your smart lights won’t dim themselves when your TV turns on, and you’ll be leaving your guests in the dark when you leave for work in a house controlled by a schedule. To get the level of smarts offered by a truly Smart Home, you need an automation platform.
When choosing an automation platform, you want to look for a few things:
- Speedy development
- Easy to read, write, and debug
- Runs on your hardware
- Fast, reliable, secure, and capable
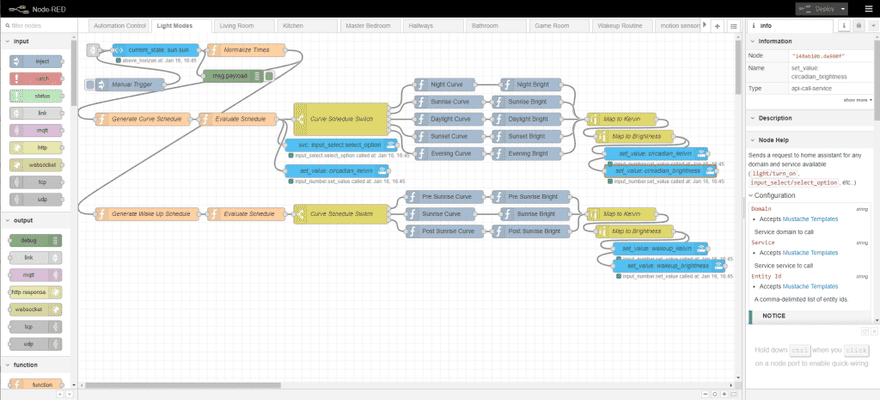
Node-Red happily checks every item off the list with a simple intuitive workflow. Node-Red makes use of a simple graphical programming interface to make creating automations as easy as dragging and dropping the behavior you want right in your browser. It requires no knowledge of programming to start using, and happily scales up the complexity of your automations with use of encapsulation (sub-flows in the lingo of Node-Red).
Installing Node Red
To start off, we’re going to get Node Red running. Before we can run it, we’ll need something to run it on. A Raspberry Pi works perfectly for this and will come in handy when testing out various home automation tools. They only cost $35 and I highly recommend getting one. If you are not familiar with Linux, no problem! There are tons of guides out there to help you get started.
Now for the install. Node red runs as a Node.js program. It can be installed using a number of different methods. If you run Home Assistant via hass.io, you can install node-red directly as an add-on. You can also run it in a Docker container if you prefer to have the instance managed. This is how I run my “production” instance of Node-Red.
We’ll focus on running locally with npm in this article as it’s the most straightforward.
sudo npm install -g --unsafe-perm node-redOk, now node-red is installed! Let’s run it.
node-red --port 8080 --userDir ~/node-red -vNote: ~/node-red is the directory you’d like node-red configuration files to be saved. Update appropriately.
Voila, we now have node-red running. You can access the dashboard in your web browser at http://localhost:8080. If it’s running on a different machine, replace ‘localhost’ with the IP of the machine on your network.
The Home Automation “Hello World!” of Node-Red
Let’s create a simple automation to use as an example of how node-red works. You want to turn your living room lights off when the sun is up, and turn them on when the sun is down.
First let’s download the Home Assistant plugin for Node Red. If you’re not familiar with Home Assistant, I highly recommend checking out my article on it.
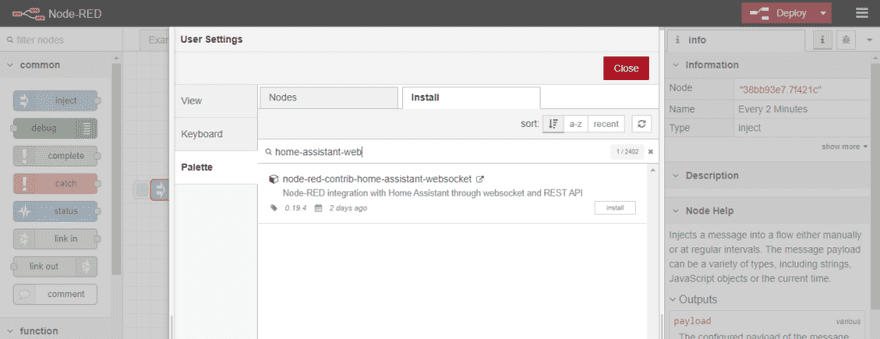
To get the plugin, open the hamburger menu in the upper right-hand corner of your screen. Select “Manage Pallet” from the options. Select the “Install” tab on the menu that pops up. Then type in “node-red-contrib-home-assistant-websocket” in the search bar, and click “install” on the plugin, and then “Install” again on the warning pop-up.
Once the install completes, you can now setup the node-red flow below by the drag-and-drop editor.
Alternatively, you can add the flow above to your instance of node-red with the “Import” option found in the hamburger menu. Simply paste the .json string below into the pop-up window.
[{"id":"38bb93e7.7f421c","type":"inject","z":"f49ab5d5.8a6978","name":"Every 2 Minutes","topic":"","payload":"","payloadType":"date","repeat":"120","crontab":"","once":false,"onceDelay":0.1,"x":130,"y":200,"wires":[["4e6902a4.b2645c"]]},{"id":"4e6902a4.b2645c","type":"api-current-state","z":"f49ab5d5.8a6978","name":"Sun State","server":"47c982d2.f98c4c","version":1,"outputs":1,"halt_if":"","halt_if_type":"str","halt_if_compare":"is","override_topic":false,"entity_id":"sun.sun","state_type":"str","state_location":"payload","override_payload":"msg","entity_location":"data","override_data":"msg","blockInputOverrides":false,"x":300,"y":200,"wires":[["9b37219d.42b1e","1cc48f9d.2ebd2"]]},{"id":"9b37219d.42b1e","type":"debug","z":"f49ab5d5.8a6978","name":"","active":true,"tosidebar":true,"console":false,"tostatus":false,"complete":"false","x":470,"y":260,"wires":[]},{"id":"1cc48f9d.2ebd2","type":"switch","z":"f49ab5d5.8a6978","name":"Above Horizon?","property":"payload","propertyType":"msg","rules":[{"t":"eq","v":"above_horizon","vt":"str"},{"t":"eq","v":"below_horizon","vt":"str"}],"checkall":"true","repair":false,"outputs":2,"x":460,"y":200,"wires":[["db407aa0.155268"],["553fc6e4.a96218"]]},{"id":"db407aa0.155268","type":"api-call-service","z":"f49ab5d5.8a6978","name":"","server":"47c982d2.f98c4c","version":1,"debugenabled":false,"service_domain":"light","service":"turn_off","entityId":"light.living_room","data":"","dataType":"json","mergecontext":"","output_location":"","output_location_type":"none","mustacheAltTags":false,"x":650,"y":180,"wires":[[]]},{"id":"553fc6e4.a96218","type":"api-call-service","z":"f49ab5d5.8a6978","name":"","server":"47c982d2.f98c4c","version":1,"debugenabled":false,"service_domain":"light","service":"turn_on","entityId":"light.living_room","data":"","dataType":"json","mergecontext":"","output_location":"","output_location_type":"none","mustacheAltTags":false,"x":650,"y":220,"wires":[[]]},{"id":"47c982d2.f98c4c","type":"server","z":"","name":"Home Assistant","legacy":false,"hassio":false,"rejectUnauthorizedCerts":true,"ha_boolean":"y|yes|true|on|home|open","connectionDelay":true,"cacheJson":true}]Note: You will need to configure this to work with your own instance of Home Assistant. Double click on the “Sun State” node and follow the instructions.
…But … that isn’t useful
So the example above is going to turn off your living room lights every 2 minutes while the sun is up, regardless of whether you want them on or not. That’s going to get pretty annoying very quickly. However, you can use a Hue Dimmer switch, or any Smart Button, to activate and deactivate the automation.
We’ll need a variable to hold the state lightstate to determine if the lights should be controlled either manually or automatically. We can accomplish this using a Home Assistant inputselect entity, and gain the benefit of Home Assistant’s reliability and state recovery.
Add the following lines of yaml code to your Home Assistant’s configuration.yaml file, and restart Home Assistant to add the entity inputselect.lightstate.
input_select:
  light_state:
    name: Light State
    icon: mdi:alarm-light
    options:
      - Automatic
      - Manual
Here we are creating an inputselect entity named inputselect.light_state and configuring it.
name – The name displayed in Lovelace UI. icon – The icon displayed in Lovelace UI. options – List of values the variable can take.
Since I’m using a Hue Dimmer Switch in this example, we’ll need to add a new plugin to node-red that can listen for button presses directly on the Hue device.
Install node-red-contrib-huemagic plugin from your Node Red browser. Once the install is complete, add the flow below to your node-red browser and deploy the changes.
[{"id":"9a474759.8899e8","type":"hue-switch","z":"f49ab5d5.8a6978","name":"Living room switch","bridge":"2ebc43d5.c1460c","sensorid":"7","skipevents":false,"x":130,"y":380,"wires":[["3213903.157ee7"]]},{"id":"3213903.157ee7","type":"switch","z":"f49ab5d5.8a6978","name":"held","property":"payload.action","propertyType":"msg","rules":[{"t":"eq","v":"holded","vt":"str"}],"checkall":"true","repair":false,"outputs":1,"x":290,"y":380,"wires":[["a197b3e3.894c9"]]},{"id":"a197b3e3.894c9","type":"switch","z":"f49ab5d5.8a6978","name":"button","property":"payload.name","propertyType":"msg","rules":[{"t":"eq","v":"On","vt":"str"},{"t":"eq","v":"Dim Up","vt":"str"},{"t":"eq","v":"Dim Down","vt":"str"},{"t":"eq","v":"Off","vt":"str"}],"checkall":"true","repair":false,"outputs":4,"x":410,"y":380,"wires":[["c951263b.34e158"],[],[],["65124c1c.44c8d4"]]},{"id":"c951263b.34e158","type":"api-call-service","z":"f49ab5d5.8a6978","name":"Activate Automatic Lights","server":"186a6f7c.292f71","version":1,"debugenabled":false,"service_domain":"input_select","service":"select_option","entityId":"input_select.light_state","data":"{\"option\": \"Automatic\"}","dataType":"json","mergecontext":"","output_location":"","output_location_type":"none","mustacheAltTags":false,"x":590,"y":360,"wires":[["3959872a.fc1cd8"]]},{"id":"65124c1c.44c8d4","type":"api-call-service","z":"f49ab5d5.8a6978","name":"Deactivate Automatic Lights","server":"186a6f7c.292f71","version":1,"debugenabled":false,"service_domain":"input_select","service":"select_option","entityId":"input_select.light_state","data":"{\"option\": \"Manual\"}","dataType":"json","mergecontext":"","output_location":"","output_location_type":"none","mustacheAltTags":false,"x":600,"y":400,"wires":[["b49c45d1.faa548"]]},{"id":"3959872a.fc1cd8","type":"api-call-service","z":"f49ab5d5.8a6978","name":"Notify Via Speaker","server":"186a6f7c.292f71","version":1,"debugenabled":false,"service_domain":"tts","service":"google_translate_say","entityId":"media_player.kitchen_display","data":"{\"message\": \"Lights set to Circadian\"}","dataType":"json","mergecontext":"","output_location":"","output_location_type":"none","mustacheAltTags":false,"x":1050,"y":360,"wires":[[]]},{"id":"b49c45d1.faa548","type":"api-call-service","z":"f49ab5d5.8a6978","name":"Living Room Lights: on","server":"186a6f7c.292f71","version":1,"debugenabled":false,"service_domain":"light","service":"turn_on","entityId":"light.living_room","data":"","dataType":"json","mergecontext":"","output_location":"","output_location_type":"none","mustacheAltTags":false,"x":840,"y":400,"wires":[["b910da69.f1abd8"]]},{"id":"b910da69.f1abd8","type":"api-call-service","z":"f49ab5d5.8a6978","name":"Notify Via Speaker","server":"186a6f7c.292f71","version":1,"debugenabled":false,"service_domain":"tts","service":"google_translate_say","entityId":"media_player.kitchen_display","data":"{\"message\": \"Lights set to Manual\"}","dataType":"json","mergecontext":"","output_location":"","output_location_type":"none","mustacheAltTags":false,"x":1050,"y":400,"wires":[[]]},{"id":"2ebc43d5.c1460c","type":"hue-bridge","z":"","name":"Philips hue","bridge":"192.168.1.203","key":"cvzBzWlAFFuEIRJp69IKNDQ31JB4ABljsQWntTWA","interval":"3000","disableupdates":false},{"id":"186a6f7c.292f71","type":"server","z":"","name":"Home Assistant","legacy":false,"hassio":false,"rejectUnauthorizedCerts":true,"ha_boolean":"y|yes|true|on|home|open","connectionDelay":true,"cacheJson":true}]The living room Hue Dimmer Switch node will fire an event whenever a button on the Dimmer Switch is pressed. It will fire subsequent events periodically when a button on the Switch is held. In order to filter out only the held signal, we use the builtin switch-node. This is the node labeled “held” in the flow above.
We will be overriding the on and off button to turn on and off the automation. The second switch-node breaks out the control for each button. In the off flow, we are making an additional service call to Home Assistant to turn the lights back on. This is because we can assume that when off is held down, the home user only wanted the automation to turn off and not the lights themselves. The last node in both button flows notifies the home user that the action was registered by playing a message through a Smart Speaker.
As the last step, we need to modify the simple light automation to check whether the state is set to “Automatic” before turning the lights on or off. This is accomplished by adding a state lookup for the Home Assistant entity inputselect.lightstate. The state lookup node has an optional switch-node built in, setting the “If State” input field to “Automatic” gives us the desired behavior without requiring any additional control nodes.
[{"id":"38bb93e7.7f421c","type":"inject","z":"f49ab5d5.8a6978","name":"Every 2 Minutes","topic":"","payload":"","payloadType":"date","repeat":"120","crontab":"","once":false,"onceDelay":0.1,"x":130,"y":200,"wires":[["5b4686c3.74a158"]]},{"id":"5b4686c3.74a158","type":"api-current-state","z":"f49ab5d5.8a6978","name":"Is Automatic?","server":"47c982d2.f98c4c","version":1,"outputs":2,"halt_if":"Automatic","halt_if_type":"str","halt_if_compare":"is","override_topic":false,"entity_id":"input_select.light_state","state_type":"str","state_location":"payload","override_payload":"msg","entity_location":"data","override_data":"msg","blockInputOverrides":false,"x":320,"y":200,"wires":[["4e6902a4.b2645c"],[]]},{"id":"4e6902a4.b2645c","type":"api-current-state","z":"f49ab5d5.8a6978","name":"Sun State","server":"47c982d2.f98c4c","version":1,"outputs":1,"halt_if":"","halt_if_type":"str","halt_if_compare":"is","override_topic":false,"entity_id":"sun.sun","state_type":"str","state_location":"payload","override_payload":"msg","entity_location":"data","override_data":"msg","blockInputOverrides":false,"x":480,"y":200,"wires":[["9b37219d.42b1e","1cc48f9d.2ebd2"]]},{"id":"9b37219d.42b1e","type":"debug","z":"f49ab5d5.8a6978","name":"","active":true,"tosidebar":true,"console":false,"tostatus":false,"complete":"false","x":630,"y":240,"wires":[]},{"id":"1cc48f9d.2ebd2","type":"switch","z":"f49ab5d5.8a6978","name":"Above Horizon?","property":"payload","propertyType":"msg","rules":[{"t":"eq","v":"above_horizon","vt":"str"},{"t":"eq","v":"below_horizon","vt":"str"}],"checkall":"true","repair":false,"outputs":2,"x":640,"y":200,"wires":[["db407aa0.155268"],["553fc6e4.a96218"]]},{"id":"db407aa0.155268","type":"api-call-service","z":"f49ab5d5.8a6978","name":"","server":"47c982d2.f98c4c","version":1,"debugenabled":false,"service_domain":"light","service":"turn_off","entityId":"light.living_room","data":"","dataType":"json","mergecontext":"","output_location":"","output_location_type":"none","mustacheAltTags":false,"x":830,"y":180,"wires":[[]]},{"id":"553fc6e4.a96218","type":"api-call-service","z":"f49ab5d5.8a6978","name":"","server":"47c982d2.f98c4c","version":1,"debugenabled":false,"service_domain":"light","service":"turn_on","entityId":"light.living_room","data":"","dataType":"json","mergecontext":"","output_location":"","output_location_type":"none","mustacheAltTags":false,"x":830,"y":220,"wires":[[]]},{"id":"47c982d2.f98c4c","type":"server","z":"","name":"Home Assistant","legacy":false,"hassio":false,"rejectUnauthorizedCerts":true,"ha_boolean":"y|yes|true|on|home|open","connectionDelay":true,"cacheJson":true}]That’s it. You have now setup an automation for your lights which can be turned on and off from your Hue Dimmer Switch.
Wrapping Up
A Smart Home without automation is not smart. The manufacturer provided apps just don’t cut it when it comes to automating your home. Node-red fixes this problem with its intuitive workflow that enables you to design the way you think. When joined with Home Assistant it becomes a complete solution for home integration. Node-red is an easy recommendation for any Smart Home.
This article is over, but the story continues. Subscribe to our newsletter to get the latest from Home With Smarts. Up next, we’ll be diving into how to use node-red to turn your smart lights into cheap leak-proof skylights that works in both the winter and summer months.


